Mtext
AutoCAD MTEXT Command
COMMAND LINE: MTEXT

DEFAULT KEYBOARD SHORTCUT: MT
RIBBON: HOME | ANNOTATION TAB | TEXT
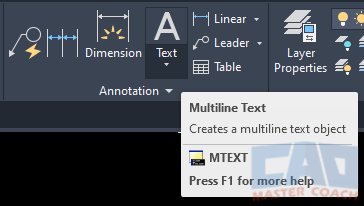
AutoCAD MTEXT
How to Create Multiline Text In AutoCAD With MTEXT
MTEXT is a powerful tool used to create multiline text and offers features that single line text DTEXT and TEXT do not. MTEXT offers the ability to wrap text, create paragraphs, bold and italicize text, create bulleted and numbered lists, and more.
When a large amount of text is placed on a drawing, MTEXT is most commonly used. One of the biggest advantages of MTEXT is that the entire block of text is one object which makes selecting the text to move it or modify it much easier. When placing text on a drawing that is more than a short line of a few words, MTEXT is most often the best choice.
To create a multiline text, initiate the MTEXT command then AutoCAD wants you to specify the First Corner. Note just above the command line, the current text style, the text height, and whether the text will be annotative is shown.

After the First Corner is selected, the MTEXT command presents seven options along with the ability to specify the Opposite Corner. The Opposite Corner can be selected either with the mouse or using the Dynamic Input entry.

When finished entering text in the Mtext area, click outside of the Mtext area to finish the command. Pressing the ENTER key will move the cursor down one line like carriage return.
The two methods to edit existing Mtext are:
- Double-Click with the mouse on any text in the Mtext area.
- Enter MTEDIT at the command line, then select the Mtext you wish to edit.
MTEXT Options
After establishing the Mtext area. There are seven MTEXT options:
1. Height

The Height option will change the height of the Mtext without changing the text style. When the Height is changed, the height will be changed only for the current use of the MTEXT command. After the command is completed, the height will revert to the default height of the current text style.
2. Justify
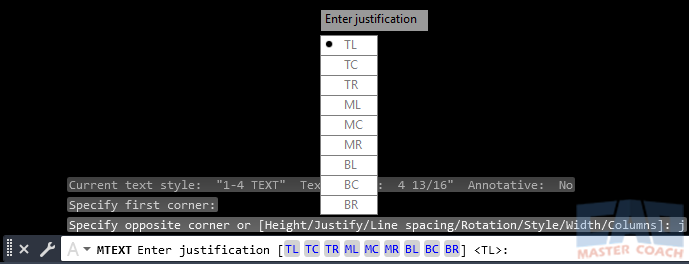
Select Justify to change the Justification of the Mtext being entered. This will change the Justification of the Mtext being entered only. After the command is completed, AutoCAD will revert to the default TL justification next the time the MTEXT command is used.
When an Mtext area is selected, one blue snap box and two blue triangle grips are shown on the Mtext area located based on the justification of the Mtext. The snap box can be used to move the Mtext, and the blue triangle grips are used to modify the size and appearance of the Mtext area.
The snap box is always located at the origin of the text based on the justification, while one blue triangle grip is placed at either the top or bottom of the Mtext area and the other is placed at either the left or right side of the Mtext area, based on the justification.
There are nine justification settings to choose from:
2.1 TL - Top Left
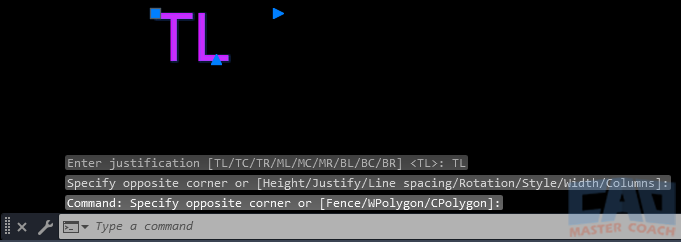
Snap Box Location: Top Left
Horizontal Grip Location: Top Right
Vertical Grip Location: Bottom Center
2.2 TC - Top Center

Snap Box Location: Top Center
Horizontal Grip Location: Top Right
Vertical Grip Location: Bottom Center
2.3 TR - Top Right

Snap Box Location: Top Right
Horizontal Grip Location: Top Left
Vertical Grip Location: Bottom Center
2.4 ML - Middle Left

Snap Box Location: Middle Left
Horizontal Grip Location: Middle Right
Vertical Grip Location: Bottom Center
2.5 MC - Middle Center

Snap Box Location: Middle Center
Horizontal Grip Location: Middle Right
Vertical Grip Location: Bottom Center
2.6 MR - Middle Right

Snap Box Location: Middle Right
Horizontal Grip Location: Middle Left
Vertical Grip Location: Bottom Center
2.7 BL - Bottom Left

Snap Box Location: Bottom Left
Horizontal Grip Location: Bottom Right
Vertical Grip Location: Top Center
2.8 BC - Bottom Center

Snap Box Location: Bottom Center
Horizontal Grip Location: Bottom Right
Vertical Grip Location: Top Center
2.9 BR - Bottom Right

Snap Box Location: Bottom Right
Horizontal Grip Location: Bottom Left
Vertical Grip Location: Top Center
3. Line Spacing

Line spacing is the vertical distance between multiple lines of text when there is enough text in the Mtext area the text wraps to the next line.
3.1 At Least
At least: The vertical space between lines depends on factors such as the font being used, characters that extend above or below the defined height that can include parentheses, stacked fractions, slashes, quotation marks, and more. When one or more characters are present that requires the vertical space to be increased, the line spacing automatically happens.
3.2 Exactly
Exactly: The vertical space between lines will always be the chosen value, regardless of the factors in the At least setting.
4. Rotation

Use Rotation to enter the Mtext at a rotated angle from the typical horizontal. The default angle that text is zero, and positive angles are measured counterclockwise. In the image above, an angle of 15 degrees is being selected at the angle to enter the Mtext.
If an angle is entered, it will be used only for the current instance of the MTEXT command and the next time the MTEXT command is used, the default angle of zero (0) will be used.
5. Style

Entering S will change the text style. This is done by typing in the name of a previously defined text style at the Dynamic Input.
6. Width

All instances of Mtext are contained within a box, which can either be made visible or invisible. Specifying a width defines the width of the box the Mtext will be contained within. The width can either be selected with the mouse, or by entering a distance at the Dynamic Input. Entering a width of zero (0) will leave the width undefined and all text entered in the Mtext box will be on the same line and not be wrapped to multiple lines.
7. Columns
If an Mtext box contains a lot of text, it can be automatically divided into columns and the entire Mtext box will remain as one object. There are three column options to choose from:

7.1 Dynamic
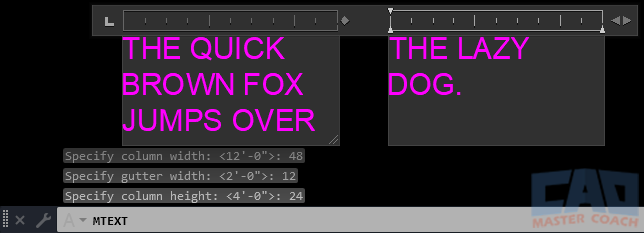
Dynamic: As the Mtext box changes size in the vertical dimension, the number of columns will change to adjust to accommodate all the Mtext.
In the example below, after selecting Dynamic Columns, the column Width, Gutter width, and the Column Height are specified. Because there is more text that can fit in one column, a second column of the same width was created and the text wrapped into the second column.
7.2 Static
Static: When Static columns are selected, the number of columns is entered and that will be the number of columns for the text to be shared between. In the example below, two columns is entered.
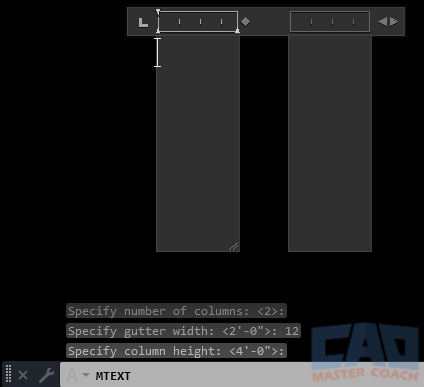
7.3 No Columns
No Columns: If No Columns is selected, then all the text in the Mtext box is kept in the same column, and word wrapping is done based on the amount of text and the width of the Mtext box. The Mtext box will dynamically adjust its height to accommodate all the text.

Mtext columns can also be modified with the mouse. First, select an Mtext and note where the Snap Box and the Triangle Grips are, which are based on the justification of the Mtext. In this case, the Mtext has TL (Top Left) justification so the Snap Box is at the top left and the Triangle Grips are at the upper right and the middle bottom.
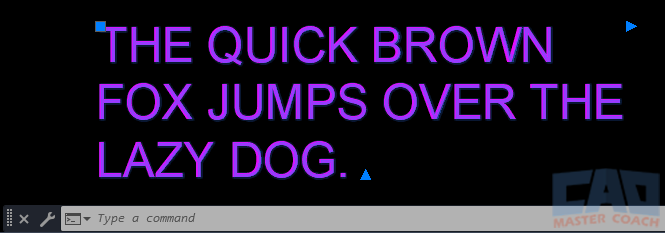
If the upper right grip is selected and moved to the left, making the Mtext area narrower.
As shown with the red arrow, the upper right grip is moved to the left to make the Mtext box narrower. Because the Mtext area is now narrower, the text wraps and the Mtext area became taller to accommodate the text. Next, move the Triangle Grip at the bottom center of the Mtext area.
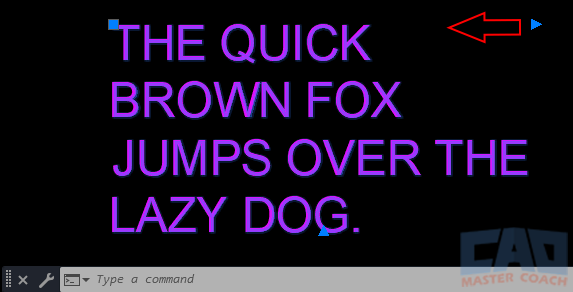
When the grip at the bottom center of the Mtext is moved up as shown by the red arrow, the Mtext area is not tall enough to accommodate all the text, so an additional column is automatically added to the right of the original column and the text wraps into the new column.

MTEXT offers a powerful and wide array of methods to place text on a drawing that resembles a word processor.
