LINE Command Best Practices
The LINE command looks simple – pick two points and you’re done. But in real production drawings, the decisions around layers, snaps, precision, and editing workflows determine whether your model stays fast, accurate, and future-proof—or slowly turns into a maintenance headache. This guide distills practical habits used by efficient drafters, so your lines are organized, editable, and standards-compliant from the first click.
1) Start with Standards: Layers, Linetypes, and Lineweights
Before you draw anything, set intentional defaults:
- Use a template (.DWT) where layers, linetypes, and lineweights are preconfigured. If you’re drawing on Layer 0 by accident, you’re already creating rework.
- Layer discipline: Create layers by function (e.g., A-WALL, A-GRID, C-ROAD-CL, E-LIGHT). Lock or freeze reference layers to prevent stray picks.
- Linetypes and scales: Confirm LTSCALE and PSLTSCALE fit your viewport behavior. For model-space drafting that prints through paper-space viewports, set PSLTSCALE = 1 so dashes look consistent across scales.
- Lineweights: Keep plotting legibility in mind. If your office uses named plot styles (.STB), map your layers to semantic styles (e.g., “Major”, “Minor”, “Centerline”).
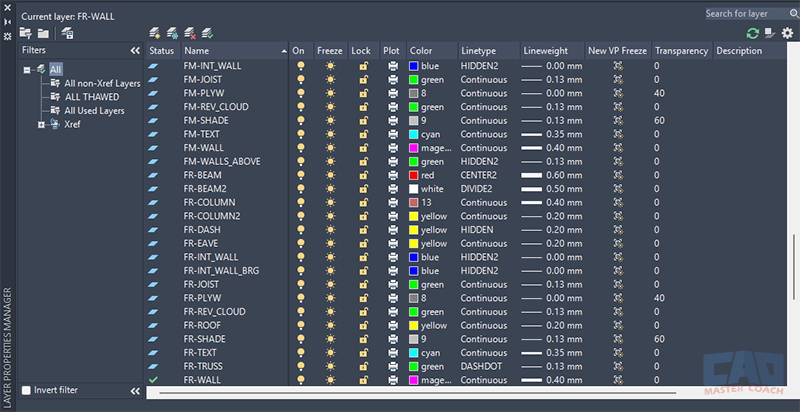
Start with standards—layers, linetypes, and lineweights—so every line plots correctly.
Having layer standards is one of the most important ways to keep drawings organized and easy to use.
Best practice: Create a “Pre-flight” routine: open your template, verify layer states, and save as the starting DWG for each project.
2) Draw with Intent: Base Points, Direction, and Length
A line is more than two points—it’s a vector that defines geometry and construction logic.
- Use relative polar input (e.g., @12<90) to maintain control over lengths and directions without eyeballing.
- Anchor on a known point: Start from grid intersections, column centerlines, or surveyed control points. This reduces cumulative error later.
- Lock orthogonality where appropriate. With Ortho (F8) or Polar Tracking (F10), enforce common angles while still allowing deliberate deviations when needed.
- Use construction lines (XLINE/RAY) on a non-plotting layer to set up geometry quickly, then draw final lines snapping to those guides.
3) Osnaps and Tracking: Precision Without Guessing
Let Object Snaps do the targeting so you can think about design instead of mouse microsurgery.
- Minimal, not maximal, snaps: Keep a small set of persistent snaps (Endpoint, Midpoint, Center, Perpendicular) plus one or two context-specific snaps (e.g., Quadrant). Too many active snaps cause false positives.
- Temporarily override with Shift + Right-Click (or typing the snap) for that command only, this shortcut is clean and fast.
- Object Snap Tracking (F11): Hover for tracking points, then track from multiple references to set a precise, virtual intersection without creating helper geometry.
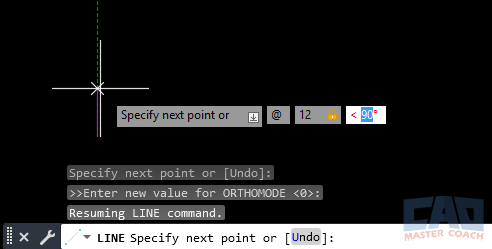
Combine relative polar input with object snap tracking for fast, accurate line placement.
The image above shows polar coordinates being entered at the Dynamic Input, a fast and accurate way to draw accurate lines.
Best practice: Turn on Dynamic Input (F12) for a heads-up angle/length readout; combine with temporary osnap overrides for speed and accuracy.
4) Keep Geometry Lightweight: Use Lines or Polylines Intentionally
Knowing when to use LINE vs POLYLINE (PEDIT later) keeps editing efficient:
- Use LINEs for simple, isolated segments that rarely need joined behavior.
- Use POLYLINEs when segments need unified properties (width, linetype generation, grips as a chain) or when you’ll fillet/chamfer corners uniformly.
If you started with lines but now need a single chain, JOIN (or PEDIT → Join) converts them. If you only need one or two segments to act together, GROUP may be lighter-weight than converting everything to a polyline.
5) Direction Matters for Annotation and Blocks
Directionality affects downstream tools:
- Arrowheads, ticks, or slope blocks may assume a line direction (start → end). Draw consistently (e.g., left-to-right, bottom-to-top) for predictable block behavior.
- For slope tags or stationing, a consistent baseline direction means text won’t flip unexpectedly.
Best practice: If direction matters, adopt a team convention and add it to your CAD standards.
6) Edit Smart: STRETCH and LENGTHEN Over Redraw
Redrawing is the slowest “edit” you can do. Prefer surgical tools:
- STRETCH: Window-cross the endpoints to move them while preserving connected geometry. Great for design changes where a wall moves or a curb shifts.
- LENGTHEN: Adjust by Delta, Total, Percent, or Dynamic—ideal when a spec changes a run length from 11’-9” to 12’-0”.
- BREAK at a point to insert gaps for doors, joints, or utilities; JOIN to fuse segments post-edit.
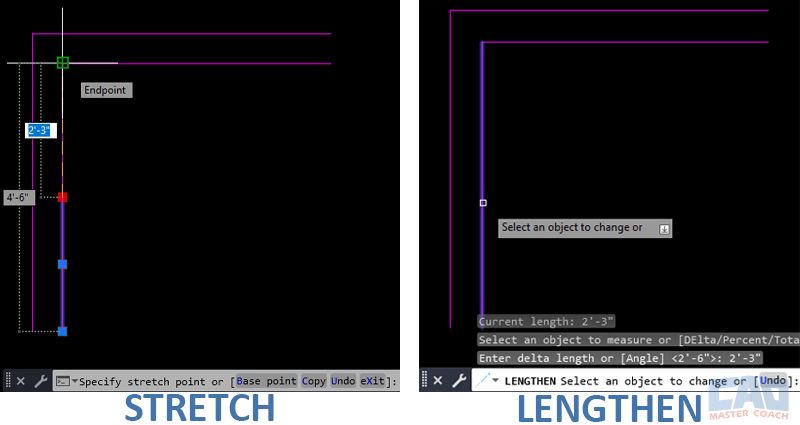
Small changes? Use STRETCH and LENGTHEN to keep geometry clean and fast.
The image above shows two methods to increase the length of the selected line so it closes the gap with the horizontal line. STRETCH uses GRIPS to move the endpoint grip and LENGTHEN uses the command line to increase the length of the line.
7) Control End Conditions: Tangency, Perpendicularity, and Fillets
Straight lines meet curves and other lines constantly:
- Ensure clean joins by using Perpendicular and Tangent snaps at interface points.
- Use FILLET with radius 0 to square corners precisely (and to ensure endpoints actually coincide).
- For chamfers, CHAMFER with set distances maintains standards without hand-trimming.
Best practice: Always force true intersections (FILLET 0 or TRIM/EXTEND with projected snaps) rather than letting segments “visually” meet. Small gaps break hatches and cause area calc errors.
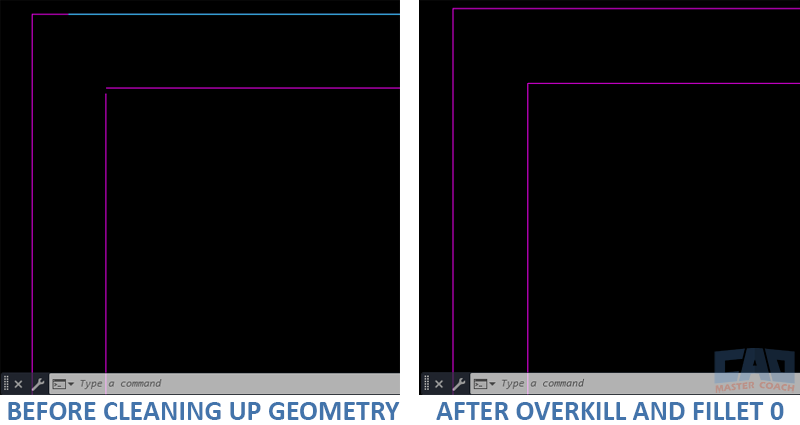
Clean joins and remove duplicates to prevent hatch breaks and plotting artifacts.
The image above shows a before and after of a messy drawing that has been cleaned up with OVERKILL and FILLET 0. On the left, a cyan line is on top of the magenta horizontal line at the top, and there is a small gap at the intersection of the two inner lines. OVERKILL was used to eliminate the duplicate lines, and FILLET 0 was used to close the gap between the lines.
8) Keep It Clean: No Overlaps, No Micro Slivers
Messy linework compounds into plotting glitches and broken quantities:
- After heavy editing, run OVERKILL to merge duplicates and clean overlaps.
- Zoom in to check for “slivers” at intersections caused by imprecise snaps.
- Snap to Midpoint and Intersection, not “somewhere near.” The time you save in the moment is lost twice over in troubleshooting.
Quality control pass: Before publishing or Xref’ing another drawing, do a sweep: OVERKILL → AUDIT → PURGE. Then re-open the file to ensure no residual errors.
9) Align to Grids and Control Geometry
Even when concept modeling, align lines to an underlying control system:
- Use grids, layout axis, or survey baselines on locked reference layers.
- When edges are “nearly” orthogonal, force them to true 0°, 90°, etc. Slight angular noise shows up in dimensions and clash checks.
Best practice: If the project is rotated relative to world, adopt a User Coordinate System (UCS) aligned to the building. Draw lines orthogonally in that UCS for sanity.
10) Document Assumptions as You Draw
Future-you (or your teammate) will thank you:
- Place short notes on a non-plot layer or add fields in labels that auto-update.
- Name saved views around areas with critical alignments so you can jump back to verify later.
- If you draw placeholders (approximate), color-code or place them on a “WIP” layer until confirmed.
11) Batch Tasks: Selection Sets, Filters, and Quick Properties
Speed comes from good selection hygiene:
- Build layer filters (“Walls-All”, “Centerlines”) to isolate and select instantly.
- Use Quick Select (QSELECT) to grab lines by length range or angle for rapid edits.
- Turn on Quick Properties for lines to adjust layer, linetype, and length on the fly without full property palette fishing.
12) Print-Ready from the Start
Draw for the final deliverable:
- Test plot styles early. Print a half-scale or reduced sheet to see if lineweights and linetypes read as intended.
- Maintain ByLayer properties so global changes are possible when a client requests a thicker cut line.
Best practice: Keep non-plot layers (construction, checks) clearly named with a -NPLT suffix and colored distinctly.
13) Interoperability: Xrefs, Blocks, and External Tools
Your linework should play nice with others:
- When a detail becomes repeated, turn it into a block. Use ByBlock properties where appropriate to inherit layer control at insert time.
- If a background is external, keep your project lines in a separate file and Xref the background. That way, revisions won’t contaminate your production geometry.
- When exporting to DXF or sharing to consultants, purge and audit first to prevent “broken” linetypes or anonymous block clutter.
14) Common Mistakes to Avoid
- Drawing on wrong layer (especially Layer 0): lock and color-code critical layers to avoid this.
- Too many running Osnaps: causes mis-snaps; override per-command instead.
- Non-coincident endpoints: always close with FILLET 0 or TRIM/EXTEND.
- Ignoring direction: breaks annotation blocks dependent on line start/end.
- Redrawing instead of editing: STRETCH/LENGTHEN/GRIPS are faster and safer.
15) Quick Checklist (Pin This Near Your Monitor)
- Open the correct template; verify layer states.
- Set Polar/Ortho and Dynamic Input as needed.
- Use minimal running osnaps + overrides.
- Draw from known control points with polar input.
- Edit with STRETCH/LENGTHEN; avoid redraws.
- Force true intersections (FILLET 0, TRIM/EXTEND).
- Clean with OVERKILL, AUDIT, PURGE.
- Print a test early; adjust ByLayer settings.
FAQ
If corners will be edited uniformly—or you want consistent linetype generation and unified grips—use a POLYLINE (or convert early with PEDIT → Join). For isolated segments, LINEs are fine; you can JOIN later when needed.
Set PSLTSCALE = 1 so dashed patterns appear consistently across paper-space viewports. Also verify LTSCALE relative to your plot scale, keep properties ByLayer, then REGEN.
Limit running osnaps to a small set (Endpoint, Midpoint, Perpendicular) and use temporary overrides (Shift+Right-Click) for special cases. Combine with Object Snap Tracking or add temporary construction lines on a non-plot layer.
Use LENGTHEN → Delta to add or subtract a fixed value. Select targets with Quick Select (by layer/length/angle) or use grips with numeric input. This preserves direction without redrawing.
Use STRETCH to move endpoints (and nearby connected geometry) to a new location—perfect for shifting walls or edges. Use LENGTHEN to adjust a segment’s length along its current bearing by delta, total, percent, or dynamically.
Force true intersections with FILLET radius 0 or TRIM/EXTEND using Intersection/Perpendicular snaps. Avoid “visual” alignments; micro-gaps cause hatch breaks and bad area calcs.
After heavy edits run OVERKILL to remove duplicates/overlaps, then AUDIT and PURGE. Keep geometry ByLayer, avoid drawing production lines on Layer 0, and test-plot early to validate lineweights/linetypes.
Yes. Some annotation blocks (arrows, slope tags, stationing) rely on start → end direction. Adopt a team convention (e.g., left-to-right, bottom-to-top) and draw consistently to prevent flipped text or symbols.
