OSNAP (Object Snap)
AutoCAD OSNAP Command Access
COMMAND LINE: OSNAP

DEFAULT KEYBOARD SHORTCUT: OS or F3
STATUS BAR: OSNAP BUTTON
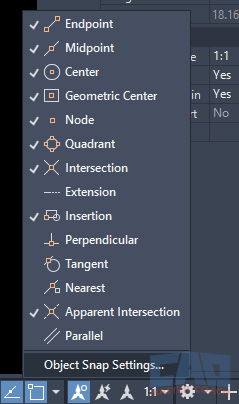
OSNAP Command Overview
Object Snap — commonly known as OSNAP — is one of the most essential precision tools in AutoCAD. While many new users focus on commands like LINE, TRIM, OFFSET, or COPY, professionals know that OSNAP is the feature that makes all those commands precise and efficient.
Without OSNAP, drawing accuracy becomes guesswork. With OSNAP enabled, every click attaches to a real geometric point: endpoints, midpoints, perpendiculars, intersections, centers, quadrants, nodes, and more. This transforms AutoCAD from a “drawing” tool into an engineering-grade drafting environment where accuracy is guaranteed.
What OSNAP Does
OSNAP identifies key points on existing objects and allows your cursor to “lock” onto them when selecting points during commands. This eliminates the need to zoom excessively or eyeball geometry.
OSNAP can function in three ways:
- Running OSNAP – snaps that are always active
- One-Time OSNAP – temporary snaps used for the next click only
- OSNAP Overrides – typed shortcuts that tell AutoCAD to use a specific snap type

Shows where to enable OSNAP
Why OSNAP Matters
Professional CAD drawings must meet extremely high standards of accuracy, and even small mistakes can lead to significant downstream problems. In engineering, architecture, and construction environments, every line, every offset, and every connection must be precise to avoid costly errors in fabrication, field layout, or design coordination. OSNAP plays a critical role in maintaining this level of precision by ensuring every point you select is tied to real, measurable geometry—not a rough estimate or eyeballed location. When you rely on snap points such as endpoints, midpoints, intersections, or centers, you eliminate the micromovements and tiny gaps that can accumulate into larger issues across an entire project.
Consistency is equally important. Professional drawings should behave predictably, meaning lines should meet exactly, arcs should connect cleanly, and dimensions should reflect true, verifiable distances. OSNAP ensures this consistency by guiding every selection to a repeatable, intentional point. With OSNAP enabled and configured correctly, you can produce drawings that trim, extend, offset, and analyze cleanly, making them easier to edit, coordinate with others, and build from. Whether you're working on detailed mechanical design, large-scale civil layouts, or structural plan sets, OSNAP helps maintain a disciplined drafting workflow where precision comes naturally and errors are caught long before they become a problem.
1. Precision = Professionalism
Every engineering discipline—civil, mechanical, structural, electrical—relies on correct geometry. A bad snap point may shift a layout by fractions of an inch, which can propagate into:
- Incorrect CNC outputs
- Incorrect quantity takeoffs
- Design coordination conflicts
- Construction errors
When OSNAP is active and properly set up, these issues disappear.
2. Dramatically Faster Drafting
OSNAP eliminates guesswork. Instead of zooming in repeatedly to find a good pick point, OSNAP:
- Highlights the snap point
- Shows the snap type (e.g., endpoint, intersection, perpendicular)
- Locks the cursor directly to that location
This reduces drafting time significantly—often by 50–70% for complex drawings.
3. Foundation for Every Other Precision Tool
OSNAP works hand-in-hand with:
- Object Snap Tracking (OTRACK)
- Polar Tracking (POLAR)
- ORTHO Mode
- Construction Lines (XLINE)
- UCS manipulations
These tools become much more effective when OSNAP is set up correctly.
4. Cleaner, More Readable Drawings
Drawings built with proper snaps:
- Modify cleaner
- Trim/extend correctly
- Don’t accumulate micro-gaps
- Produce accurate dimensions
- Export cleanly to other programs (Revit, Inventor, Civil 3D, GIS, CNC, etc.)
Professionals know: If your drawing is messy, your snaps are probably wrong.
How to Use OSNAP (Step-by-Step)
This section expands the practical workflow.
Turning OSNAP On/Off
There are three primary ways to toggle OSNAP:
Method 1: Status Bar
Click the OSNAP icon on the lower Status Bar.
- Blue = On.
- Gray = Off.
Method 2: Keyboard
Press F3 to toggle OSNAP instantly.
Method 3: Command Line
Type: OSNAP
- Press Enter, then set your running snaps.
Method 4: Right-Click OSNAP
Right-click the OSNAP button → choose Settings to open the Object Snap dialog.
One-Time Object Snaps
One-Time OSNAPs are perfect when you need a snap point once without changing your overall settings.
Access Methods
- Shift + Right-Click → opens a full list
- Type the OSNAP shortcut during a command (e.g., MID, CEN, PER)
- Hold Ctrl while hovering to cycle through possible snap points (optional behavior depending on settings)
Why Use Them?
One-time snaps prevent your running snaps from becoming overloaded. If you need a Tangent snap only 5% of the time, don’t enable it permanently—just use TAN as a one-time snap.

Accessing temporary snaps
Running Object Snaps
Running OSNAPs are active continuously until you turn them off.
Recommended Running Snaps (Most Users)
- Endpoint
- Midpoint
- Center
- Intersection
These four cover ~80% of drafting workflows and maintain high responsiveness.
You can turn on more, but be careful: too many running snaps can cause AutoCAD to “hunt,” slowing down cursor performance.
Understanding Snap Feedback
When OSNAP detects a snap point, AutoCAD displays:
- A white crosshair marker (snap glyph)
- A yellow tooltip showing the snap name
- Temporary highlighting of the referenced geometry
If you don’t see these:
- Ensure OSNAP is turned on
- Check if selected snaps are active
- Increase aperture size (Options → Drafting → Snap Aperture Size)

Visual feedback for OSNAP detection
Common OSNAP Modes (Table)
| OSNAP Mode | Best For | Shortcut |
|---|---|---|
| Endpoint | Line/arc start & end points | END |
| Midpoint | Exact middle of objects | MID |
| Center | Circle/arc centers | CEN |
| Intersection | Crossing lines | INT |
| Perpendicular | 90° exact connections | PER |
| Tangent | Tangency to arcs/circles | TAN |
| Quadrant | N/S/E/W points of circles | QUA |
| Node | Points generated by POINT command | NODE |

How to configure running snaps
Keyboard Shortcuts for OSNAP
These are some of the most powerful speed multipliers in AutoCAD. Type them during a command when AutoCAD asks for a point.
- END — Endpoint
- MID — Midpoint
- CEN — Center
- INT — Intersection
- PER — Perpendicular
- TAN — Tangent
- NEA — Nearest
- QUA — Quadrant
- APP — Apparent Intersection
- EXT — Extension
- NODE — Node
Best Practices for Using OSNAP
Now that you know how OSNAP works, let’s look at some simple best practices that can make your drafting smoother, faster, and a lot more enjoyable.
1. Don’t Turn On Every OSNAP
AutoCAD works best when it has only 3–6 running snaps.
Symptoms of having too many running OSNAPs:
- Cursor lagging
- Wrong snap points selected
- Difficulty selecting corners
- Cursor “dancing” between several potential snaps
Start simple. Add additional snaps only when needed.

OSNAP + tracking in use
2. Use One-Time Snaps for Rare Situations
If you need a perpendicular snap only occasionally, don’t enable PER as a running snap.
Use:
- Shift + Right-Click → Perpendicular
- Or type PER during your command
This preserves your core snapping environment.
3. Adjust OSNAP Aperture Size
If snapping seems unreliable:
- Go to OPTIONS
- Click Drafting
- Increase Aperture Size to 10–15
This widens AutoCAD’s detection window.
Turn Off or Limit OSNAP When Dimensioning
Many beginners accidentally dimension to snap points rather than extension line origins, causing dimensions to appear correct but reference the wrong geometry.
Before dimensioning:
- Turn off OSNAP
OR
- Disable snap types that interfere with dimensioning (Intersection, Endpoint)
5. Combine OSNAP with Other Precision Tools
The true power of OSNAP emerges when used with:
Object Snap Tracking (OTRACK)
Allows you to build geometry from existing snap points without construction lines.
Polar Tracking
Locks your cursor to angles (0°, 90°, 45°, etc.).
ORTHO
Restricts movement to horizontal/vertical.
Related Commands and Tools
| Command / Tool | Description |
|---|---|
| ORTHO | Locks cursor movement to horizontal and vertical directions for precise linear drafting. |
| Polar Tracking | Guides cursor movement along preset angles, helping you draw angled lines accurately. |
| Object Snap Tracking | Projects temporary alignment paths from OSNAP points to help you line up new geometry. |
| OSNAP | Locks onto precise geometric points like endpoints, midpoints, and intersections. |
| Dynamic Input | Displays distances, angles, and command prompts at the cursor for more intuitive drafting. |
| Direct Distance Entry | Allows you to enter exact distances simply by moving the cursor in a direction and typing a value. |
Frequently Asked Questions
Check:
- OSNAP is turned on
- Running OSNAPs are selected
- Aperture size is large enough
- The object type supports snap points
- (splines, images, and some proxy objects may not)
Use fewer running snaps.
Most users only need:
- Endpoint
- Midpoint
- Center
- Intersection
Yes. OSNAP is even more critical in 3D for:
- Snapping to corners of solids
- Selecting UCS origins
- Aligning objects
- OSNAP snaps to a point.
- OTRACK allows geometry to be created based on that point.
