Dynamic Input in AutoCAD: A Smarter Way to Draw
Introduction
AutoCAD has long been the gold standard in computer-aided design, offering precision tools for architects, engineers, and drafters. Over the years, its developers have continually refined the interface to make drawing faster and more intuitive. One of the most useful but often overlooked features is Dynamic Input. Unlike the traditional workflow that relies heavily on the command line, Dynamic Input brings command prompts, options, and dimension input directly to your cursor.
By presenting information where your eyes naturally focus—the drawing area—Dynamic Input helps reduce errors, improves efficiency, and makes drafting feel more modern. For beginners, it simplifies learning; for professionals, it streamlines routine tasks. This article will explore what Dynamic Input is, why it matters, how it works, and how you can customize it to fit your drafting style.
Dynamic Input is optional — and knowing when to use it matters more than knowing how to turn it on.
1. What Is Dynamic Input?
Dynamic Input is essentially a “heads-up display” for AutoCAD. When Dynamic Input is enabled, everything entered at the command line appears at the cursor, rather than the command line. Instead of constantly looking down at the command line at the bottom of your screen, a small tooltip appears next to your crosshair. These tooltips display distances, angles, options, and prompts depending on the command you are running.
For example, when you draw a line, the tooltip might show the length and angle fields. You can type values directly into these fields and press Tab to switch between them. The result is an interactive drawing process where the information you need is exactly where you need it.
Introduced to make AutoCAD feel more user-friendly, Dynamic Input helps bridge the gap between command line precision and visual drafting.
2. Why Dynamic Input Matters
Drafting in AutoCAD without Dynamic Input often means splitting your attention between the drawing area and the command line. This back-and-forth can slow you down and increase the chance of missing an important option. Dynamic Input solves this problem by keeping your focus entirely within the workspace.
For new users, Dynamic Input acts as a teaching tool by displaying available command options in real time. Instead of memorizing complex command syntax, you can see your choices appear as you draw. For experienced users, it shortens the decision-making process. Distances, coordinates, and angles appear dynamically, so you can make adjustments before committing to a command. The combination of visual feedback and data entry directly at the cursor makes for a smoother, more efficient drafting experience.
3. Anatomy of Dynamic Input
Dynamic Input is not a single feature but a collection of three components that work together:
- Pointer Input: Displays coordinates, lengths, and angles as you move your cursor. This helps you visualize geometry before committing to values.
- Dimension Input: Allows you to enter exact numbers into fields that appear beside the cursor. For example, when drawing a line, you can enter its length and angle directly into the tooltip.
- Dynamic Prompts: Present command instructions and available options at the crosshair. Options often show shortcut keys in brackets, reinforcing AutoCAD’s command system while keeping everything visible in context.
These three parts combine to form a floating, mini command line. It doesn’t replace the traditional command line entirely, it enhances the command line by making critical information available exactly where your attention is.
4. Enabling and Disabling Dynamic Input
Dynamic Input is easy to control. You can turn it on and off at any time depending on your needs.
The quickest method is to press the F12 key, which toggles the feature instantly. Alternatively, you can click the Dynamic Input button on the AutoCAD status bar. The icon looks like a crosshair with a tooltip box, making it easy to spot among the status bar tools.
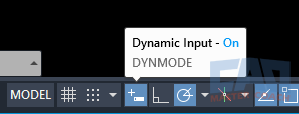
AutoCAD status bar showing the Dynamic Input toggle button.
Some users prefer to leave it enabled permanently, while others toggle it off when working in tight, detail-heavy areas where the tooltips can obscure geometry. Because switching is so quick, it’s worth experimenting to see what feels most comfortable for different stages of your workflow.
Get the Top 35 AutoCAD Commands for FREE
Additionally, Dynamic Input can be toggled On and Off at the Status Bar at the bottom right portion of the screen. If the Dynamic Input button is not shown on the Status Bar, press the hamburger menu at the bottom right corner of the screen and select Dynamic Input and ensure a check mark appears.

Enable Dynamic Input Button on Status Bar
5. Drawing with Dynamic Input: Practical Examples
Dynamic Input becomes particularly powerful when you start applying it to everyday drafting tasks.
When using the LINE command, for example, the tooltip displays both the length and the angle of the segment as you draw. You can enter exact values for either field, tab between them, or simply rely on the visual feedback to position your line correctly. This eliminates the guesswork of eyeballing a line and later checking its properties.
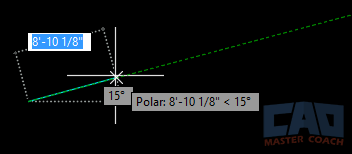
AutoCAD line command with Dynamic Input fields for length and angle near the crosshair.
With Rectangles and Polygons, the tooltips update dynamically as you drag the cursor. This allows you to preview the size and proportions before locking them in with numeric values. Similarly, commands like Move and Copy display real-time distance measurements, making it easier to align objects or place them precisely relative to existing geometry.
The Rotate command benefits as well, with Dynamic Input showing the angle as you move the object. This lets you see the result of your rotation before committing to it. Across these examples, the consistent theme is immediate feedback paired with direct input, saving time and reducing corrections later.
6. Customizing Dynamic Input
One of the strengths of Dynamic Input is that it can be tailored to your preferences. To customize it, right-click the Dynamic Input button on the status bar and choose Dynamic Input Settings.
Here, you can fine-tune what appears at the crosshair. For instance, you might enable pointer input but disable dimension input if you only want visual feedback without being prompted for numeric values. You can also choose whether default values should appear automatically or only when you start typing.
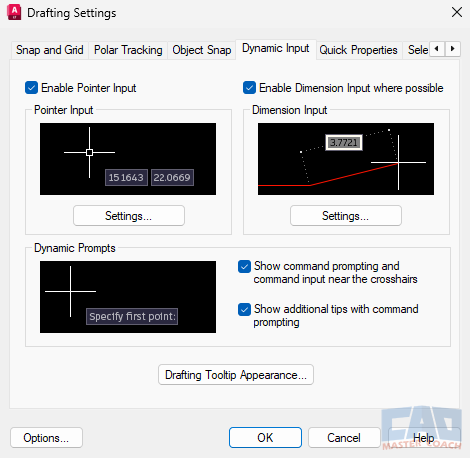
Dynamic Input settings dialog box in AutoCAD with customization options.
Adjusting these settings allows you to reduce clutter and focus on the aspects of Dynamic Input that add the most value to your workflow. For some, that means seeing coordinates constantly. For others, it may mean simplifying the interface so only critical prompts appear.
7. Pros and Cons of Dynamic Input
Dynamic Input Advantages
The biggest advantage of Dynamic Input is keeping your eyes on the geometry. By reducing the need to look at the command line, you stay more focused and less distracted. For beginners, Dynamic Input acts as a built-in tutorial, presenting command options clearly and visually. It also reduces drafting errors by showing dimensions and coordinates in real time, which means you catch mistakes before they happen.
Dynamic Input Disadvantages
That said, Dynamic Input is not without its drawbacks. Some experienced users find it slows them down, especially if they are already comfortable with command line shortcuts. In very dense drawings, the floating tooltips can obscure nearby geometry, making precision work more difficult. Others feel that once they’ve mastered AutoCAD, the feature becomes unnecessary clutter.
Ultimately, whether you use it all the time or only in specific situations comes down to personal preference.
8. When to Use Dynamic Input
Dynamic Input shines in specific scenarios. It is especially helpful for beginners, who may not have memorized all command options. By surfacing prompts directly at the crosshair, it flattens the learning curve. It is also invaluable when working with precision geometry, where seeing real-time distances and angles ensures accuracy. Finally, instructors often use it when teaching, since the visible prompts make it easier to demonstrate commands to students.
On the other hand, there are times when you may prefer to turn it off. In complex detail drawings, tooltips can get in the way, especially when working in crowded areas. If you’re running scripts or batch commands, Dynamic Input offers little benefit since those workflows bypass interactive prompts. Learning when to use it and when to step back is part of mastering AutoCAD’s flexibility.
9. Best Practices
To get the most out of Dynamic Input, keep a few best practices in mind. First, learn to use the Tab key to switch between input fields such as length and angle. This small habit can dramatically speed up data entry. Second, press the Down Arrow key to cycle through available command options without moving your mouse. This makes option selection faster and keeps your workflow smooth.
Don’t hesitate to toggle the feature on and off with F12 when tooltips obstruct your view. Over time, you’ll develop a sense for when Dynamic Input enhances your work and when it gets in the way. Finally, spend time experimenting with the customization settings until the display feels like a natural extension of your drafting style.
10. Final Thoughts
Dynamic Input is one of those features in AutoCAD that many users either love or ignore. For those who embrace it, the ability to keep your eyes on the drawing area, see dimensions in real time, and access options without leaving the crosshair can transform the way you work. For others, especially those who prefer the command line’s speed and simplicity, it may feel unnecessary.
Regardless of which camp you fall into, it’s worth understanding how Dynamic Input works and trying it out in your own projects. At the very least, it will give you another tool in your AutoCAD toolkit—a way to make your workflow more visual, more intuitive, and, for many users, more efficient.
So next time you launch AutoCAD, tap F12, enable Dynamic Input, and see for yourself how this feature can reshape your drafting experience.
Get the Top 35 AutoCAD Commands for FREE
Frequently Asked Questions (FAQ)
Dynamic Input displays command prompts, distances, angles, and coordinate fields near the cursor so values can be entered directly in the drawing area instead of only through the command line.
No. Dynamic Input is optional. AutoCAD works the same whether it is on or off, and many experienced users choose not to use it.
Dynamic Input can obscure geometry, interfere with object snaps, or slow down users who prefer keyboard-driven workflows and the command line.
Dynamic Input is helpful for beginners, conceptual drafting, and situations where visual feedback for distances and angles improves clarity while working.
Dynamic Input does not change AutoCAD’s accuracy. Precision still depends on correct snaps, constraints, and numeric input.
Dynamic Input displays prompts and input fields near the cursor, while the command line displays them at the bottom of the screen. Both work simultaneously.
Yes. Dynamic Input behavior can be adjusted in Drafting Settings, including whether dimensional input, coordinate input, or command prompts are shown.
Often yes. Dynamic Input helps new users understand what AutoCAD is asking for during commands, though learning the command line remains important long-term.


