Mastering Text Scaling in AutoCAD
Mastering Text Scaling in AutoCAD: The Complete Guide for Consistent Plotting

Introduction
If you have spent time drafting in AutoCAD, you know that geometry is only half the battle. The other half is annotation—text, notes, callouts, dimensions, leaders, and tables. These elements tell the story of the drawing. Without them, a contractor, engineer, or fabricator cannot build the project. For annotations to work, they must be consistent and legible when plotted.
This sounds simple, but anyone who has worked in CAD knows it is a constant challenge. A note that looks perfectly fine in one viewport may shrink to near invisibility in another. A dimension string may read clearly on a detail, but in a floor plan, it suddenly looks out of proportion. Tables may refuse to scale in a way that matches the rest of the sheet.
The goal is simple: no matter what viewport scale is applied, all text should plot at the same paper size. If you want your notes to appear at 3/32" (about 2.5 mm) on paper, then they should plot at exactly that height regardless of whether the viewport is set to 1/8" = 1’-0”, 1/4" = 1’-0”, or 1:100. The same consistency should apply to dimension text, leaders, multileaders, tables, and hatches.
AutoCAD provides two main ways to handle this:
- The Manual Scale Method – the traditional workflow used for decades, where drafters manually calculate text heights for each viewport scale.
- Annotative Scaling – a feature introduced in AutoCAD 2008 that automates scaling by allowing text and other annotations to adjust themselves based on viewport scale.
While annotative scaling offers powerful automation, it also introduces complexity and requires constant management. Many CAD managers, architects, and engineers continue to prefer the Manual Scale Method because it is predictable, easy to control, and compatible across all versions of AutoCAD.
This guide takes a deep dive into both methods, with an emphasis on the manual scale workflow. We will explore how text scaling affects not just notes but also dimensions, leaders, tables, blocks, and hatches. We will cover standards, cheat sheets, and best practices that you can use to establish a consistent system in your office. Whether you’re a new drafter trying to understand the basics or a CAD manager developing company standards, this article will give you the tools to master text scaling once and for all.
1. Why Consistent Annotation Matters
The purpose of annotation is communication. The cleanest set of linework in the world is useless if the notes and dimensions are illegible. The construction industry relies on clarity and precision, and nothing undermines that faster than inconsistent annotation.
Imagine walking onto a job site with a set of drawings where the floor plan text is easy to read, but the details use a different scaling system. On one sheet, notes appear oversized compared to dimensions. On another, room tags are barely visible. This inconsistency doesn’t just look unprofessional—it can cause mistakes that cost real money.
1.1 Professional Standards
Most architecture and engineering firms adopt text height standards. The American Institute of Architects (AIA) and ISO guidelines are two common references. Standard sizes include:
- General notes: 3/32” (2.5 mm)
- Dimensions: 1/8” (3 mm)
- Room names/titles: 3/16” (5 mm)
- Sheet titles/headings: 1/4” (6 mm)
By maintaining these paper heights consistently across all sheets, drawings remain legible whether printed on 11x17, 24x36, or 30x42 paper.

In the image above, each of two pieces of text are sized differently. The upper text is 2 3/8” tall and is sized to plot at 1/2" = 1’-0” scale. The lower is 4 13/16” tall and is sized to plot at 1/4" = 1’-0” scale. When each is in a VIEWPORT window that is scaled to the appropriate scale, they will be the correct size on the plotted-out drawing.
1.2 Real-World Consequences of Poor Scaling
- A dimension string plotted too small may be unreadable in the field, leading to construction errors.
- Notes that appear at wildly different sizes across sheets may lead permit reviewers to reject a drawing set.
- Large-format plans with tiny annotations frustrate contractors, increasing the risk of misinterpretation.
1.3 Efficiency and Productivity
Consistency in annotation isn’t just about aesthetics—it saves time. If you know your text will always plot at a standard size, you spend less time adjusting, scaling, and troubleshooting. A standardized system means new employees can step into your workflow without retraining on every project.
For these reasons, text scaling is not just a drafting issue—it is a professional practice standard that affects the entire lifecycle of a project.
2. The Manual Scale Method (Traditional, Reliable, Still King)
The Manual Scale Method is the foundation of annotation scaling in AutoCAD. It is the system drafters used long before annotative scaling existed, and it remains the most reliable method today. Instead of relying on AutoCAD to scale text automatically, you calculate model-space text heights manually so that they always plot correctly on paper.
2.1 How It Works
In the manual scale method, you decide how tall you want text to appear on paper (your plotted text height) and then multiply that by the scale factor of the viewport.
Formula:
Model Text Height=Plotted Height×Scale Factor\text{Model Text Height} = \text{Plotted Height} \times \text{Scale Factor}Model Text Height=Plotted Height×Scale Factor
The scale factor is the denominator of the viewport’s scale ratio.
- 1/4” = 1’-0” → Scale factor = 48
- 1/8” = 1’-0” → Scale factor = 96
- 1:100 → Scale factor = 100
This formula ensures that text drawn in model space appears at the correct height on paper once the viewport is scaled.

2.2 Worked Examples
Suppose you want your general notes to plot at 3/32” tall (0.09375”).
- At 1/4” = 1’-0” (scale factor 48):
0.09375 × 48 = 4.5 units tall in model space.
- At 1/8” = 1’-0” (scale factor 96):
0.09375 × 96 = 9 units tall in model space.
- At 1” = 1’-0” (scale factor 12):
0.09375 × 12 = 1.125 units tall in model space.
If you wanted 1/8” text instead, you would simply substitute 0.125 for the plotted height in the formula.
2.3 Cheat Sheet for Common Imperial Scales (3/32” Paper Height)
| Scale | Scale Factor | Model-Space Text Height |
|---|---|---|
| 1/8" = 1'-0" | 96 | 9" |
| 3/16" = 1'-0" | 64 | 6" |
| 1/4" = 1'-0" | 48 | 4.5" |
| 1/2" = 1'-0" | 24 | 2.25" |
| 1" = 1'-0" | 12 | 1.125" |
| 3" = 1'-0" | 4 | 0.375" |
Cheat Sheet for Common Imperial Scales (3/32" Paper Height)
How to use this table: These values assume a plotted text height of 3/32" on paper. Set your text height in model space using the value shown for your drawing scale to maintain consistent plotted text size across layouts.
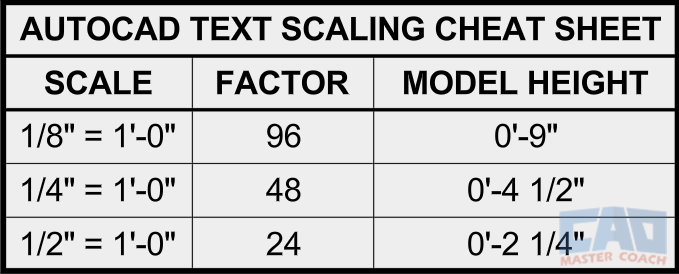
2.4 Managing Multiple Scales in One Drawing
Most sheets contain more than one viewport scale. A floor plan might be shown at 1/8” = 1’-0” while a section detail on the same sheet is at 3/4” = 1’-0”. The manual scale method requires you to prepare for this.
Strategies include:
- Creating multiple text styles (e.g., 1-8 TEXT, 1-4 TEXT, 1-2 TEXT).
- Using separate layers for each scale of text.
- Creating a scale factor reference chart for your team.
2.5 Advantages of the Manual Scale Method
- Predictable and precise—no automation surprises.
- Works in every version of AutoCAD.
- Easy to troubleshoot.
- Scales can be memorized over time, speeding up workflow.
2.6 Limitations
- Requires manual calculation or reference to charts.
- More setup when working with multiple scales.
- Errors can occur if staff forgets to adjust height.
Despite these challenges, the Manual Scale Method is still preferred by most professionals because it offers total control over how text and dimensions behave.
3. Annotative Scaling: The Modern Method
When AutoCAD 2008 introduced Annotative Scaling, Autodesk’s goal was to eliminate the math and manual effort behind annotation scaling. In theory, it’s a brilliant idea: you specify your desired paper size once, and AutoCAD takes care of resizing text, dimensions, leaders, and other annotations so that they always appear correctly across different viewport scales.
3.1 How It Works
Annotative objects have a special property: they are tied to an annotation scale. When you set a text style, dimension style, or block to “Annotative,” you tell AutoCAD how large it should appear on paper (for example, 2.5 mm or 3/32"). The object is then automatically scaled in model space depending on the current annotation scale and the viewport’s scale factor.

For example, if you create a 2.5 mm annotative text object in model space, it will appear at the correct plotted height whether your viewport is 1:50, 1:100, or 1:200—because AutoCAD generates separate “scale representations” of the object for each scale you use.
3.2 Advantages
- Automation: You no longer need to calculate model-space text heights manually.
- Consistency: One text object can appear correctly sized across multiple viewports.
- Fewer Duplicates: You avoid having multiple versions of the same text for different scales.
- Industry Adoption: Many consultants and firms are moving toward annotative workflows.
Get the Top 35 AutoCAD Commands for FREE
3.3 Disadvantages
- Model Space Clutter: Text can look enormous or tiny depending on your current annotation scale, which can be disorienting.
- Complex Management: Each annotative object can store multiple scale representations, which may cause confusion or duplication.
- Performance Issues: Large projects with hundreds of annotative scales can slow down drawing performance.
- Training Burden: Staff must understand how annotation scales work and actively manage them.
3.4 Troubleshooting Common Issues
- Text not visible in a viewport? The object is missing that viewport’s annotation scale. Use ANNOUPDATE or manually add the scale.
- Text too large in model space? Check your current annotation scale in the status bar.
- Drawings from consultants missing scales? Convert objects or reset annotation settings.
3.5 Final Thoughts
Annotative scaling is powerful, but it requires strict discipline. It’s best suited for firms with strong CAD standards and training programs. Smaller teams often find it more frustrating than helpful. This is why many professionals still rely on the Manual Scale Method for text and dimensions, while adopting annotative scaling for hatches, blocks, or symbols where it offers clear benefits.
4. Dimensions and Scaling
Text scaling isn’t limited to notes—it also applies to dimensions, which must be carefully managed to ensure consistency across sheets. If your dimension text is too small, it becomes unreadable; if too large, it dominates the drawing. Dimension arrows, extension lines, and spacing must also scale properly.
4.1 Manual Scale Method for Dimensions
The traditional approach is to create dimension styles tailored to specific viewport scales. For example, you might have:
- 1-8 DIMS for 1/8” = 1’-0”
- 1-4 DIMS for 1/4” = 1’-0”
- 1-2 DIMS for 1/2” = 1’-0”

Each dimension style specifies the correct text height, arrow size, and spacing in model space so that the plotted dimension always meets your paper standard.
AutoCAD’s DIMSCALE variable (or DIMLFAC for linear scale factors) is often used to adjust dimension elements. For instance, if you want dimension text to plot at 3 mm, you multiply by the viewport’s scale factor to determine model-space text height.
This method requires careful organization but ensures dimensions are always predictable.
4.2 Annotative Dimensions
With annotative scaling, you can create a single dimension style marked “Annotative.” AutoCAD automatically adjusts text height, arrow size, and spacing to match the viewport’s scale. This reduces the need for multiple dimension styles.
However, just like with text, dimensions can become confusing in model space. You may see overlapping dimension strings when multiple scale representations are active. You also need to make sure the correct scales are assigned to all objects, or they won’t appear in viewports.
4.3 Best Practices
- Decide on one plotted dimension text height (e.g., 1/8” or 3 mm).
- Keep dimension styles clearly named and organized by scale (if using the manual method).
- For annotative dimensions, train staff to manage annotation scales diligently.
- Always test-plot a sample sheet before finalizing standards.
Ultimately, many offices still prefer the manual scale method for dimensions because it offers precision and avoids the complexity of annotative scaling.
5. Leaders, Multileaders, and Callouts
Leaders and multileaders are critical annotation tools for pointing to objects and adding explanatory notes. Like text and dimensions, they must plot consistently across scales.
5.1 Manual Scale Method for Leaders
In the manual method, you create leader and multileader styles sized for the viewport scale. For example, if you want your leader arrowhead to appear 1/8” on paper, you calculate its size in model space using the scale factor. The same applies to text attached to the leader.
This requires creating multiple leader styles—MLD-48, MLD-96, etc.—but ensures consistency. Once you memorize common scale factors, setting the correct leader size becomes second nature.
5.2 Annotative Leaders
Annotative leaders and multileaders adjust themselves automatically across scales, just like text and dimensions. This eliminates the need for multiple styles. You define one paper height, and AutoCAD resizes the leader arrow and text accordingly.
The drawback is the same as with other annotative objects: leaders can become messy in model space if multiple annotation scales are active. Some leaders may disappear if they lack the correct scale representation.
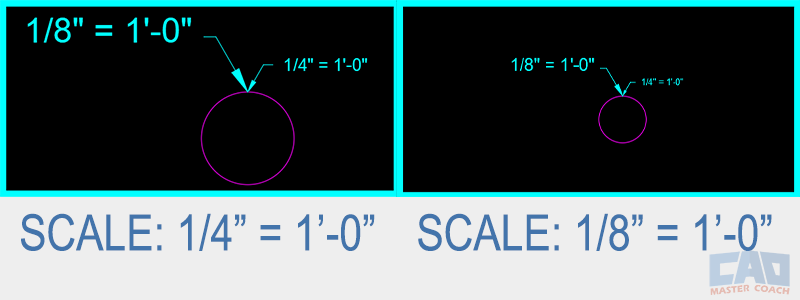
In the image above, both viewports show the same circle with the same leader and note with each viewport zoomed to a different scale. The viewport on the left is zoomed to 1/4" = 1’-0” scale and the viewport on the right is zoomed to 1/8" = 1’-0” scale.
5.3 Pitfalls and Best Practices
- Arrowheads too small/large: usually caused by mismatched scale factors.
- Leaders not showing: missing annotation scale.
- Overlapping leaders: too many scale representations active at once.
Many offices use manual scaling for leaders and multileaders, especially in construction documents, because it avoids confusion and maintains precision. Annotative leaders are more useful in drawings where multiple scales are frequently used on a single sheet.
6. Tables and Schedules
Tables and schedules present unique challenges in AutoCAD scaling. They combine text, gridlines, and often block symbols within a single object. This makes scaling more complicated than with simple notes.
6.1 Manual Scale Method for Tables
When using the manual method, tables placed in model space are scaled according to the viewport’s scale factor. This means you must calculate not only the text size but also the row heights and column widths. For example, if you want table text to plot at 3/32” and row height at 1/4”, you multiply each by the viewport’s scale factor.
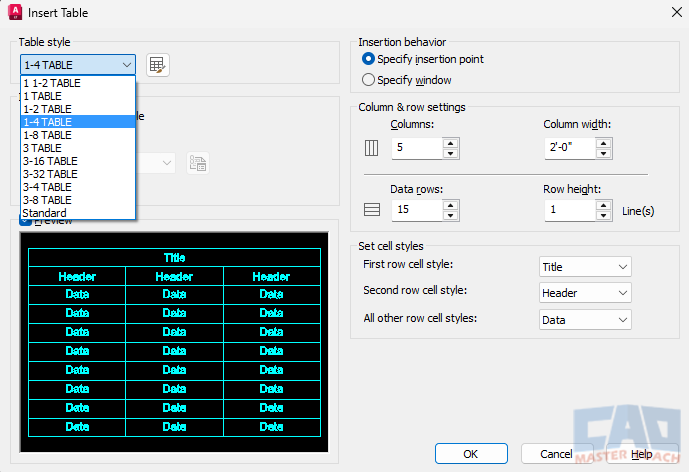
Done properly, this can be an efficient method of keeping track of table sizes. It does require predefining table sizes. Many drafters solve this by creating separate versions of tables for different scales, or by standardizing schedules to appear in paper space at 1:1.
6.2 Annotative Tables
Annotative text can be used inside tables, ensuring consistent text size across scales. However, the gridlines of tables do not scale annotatively. This means the proportions between text and table gridlines may become distorted.
For example, annotative text in a table may look correct on paper, but the row heights remain fixed in model space, creating awkward spacing.
6.3 Best Practices
- Paper space placement: The easiest solution is to place general notes and schedules directly in paper space at 1:1 scale. This avoids scaling altogether.
- Model space placement: If tables will be in model space, decide early whether you will use the manual or annotative method and apply it consistently.
- Consistency: Never mix scaled and annotative tables in the same project, as it creates chaos.
7. Hatches, Symbols, and Blocks
Scaling issues also affect hatches, symbols, and blocks—especially those containing text attributes.
7.1 Manual Scale Method
For hatches, you manually adjust the hatch scale factor based on the viewport scale. For example, a concrete hatch that looks correct at 1/4” = 1’-0” may appear too dense at 1/8” = 1’-0”. You must recalculate the hatch scale for each viewport.
Blocks with attributes also need manual scaling. A room tag, for example, must be created at the correct model-space size based on the viewport scale factor. This often leads to multiple block definitions for different scales.
7.2 Annotative Hatches and Blocks
Annotative hatches and blocks automatically adjust themselves across scales. A symbol like a north arrow or section marker can be made annotative, ensuring it always plots at the correct size on paper. Similarly, blocks with text attributes can be set annotative, saving time.
This is one area where annotative scaling shines. Instead of duplicating symbols for multiple scales, you can create one annotative block that works everywhere.
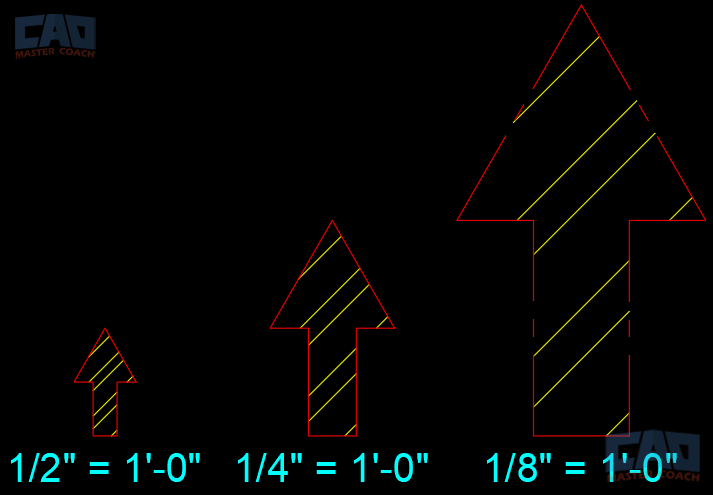
In the image above, each North Arrow is twice as large as the one to the left. Note the scale each is set at. Because the hatch patterns are Annotative, they all produce the same line pattern, regardless of the size of the arrow. Each hatch pattern is set to the Annotative Scale shown below each arrow.
7.3 Best Practices
- Use annotative blocks for symbols like room tags, north arrows, and detail callouts.
- Consider annotative hatches for patterns that appear across multiple scales.
- Continue using the manual method for text and dimensions to avoid confusion.
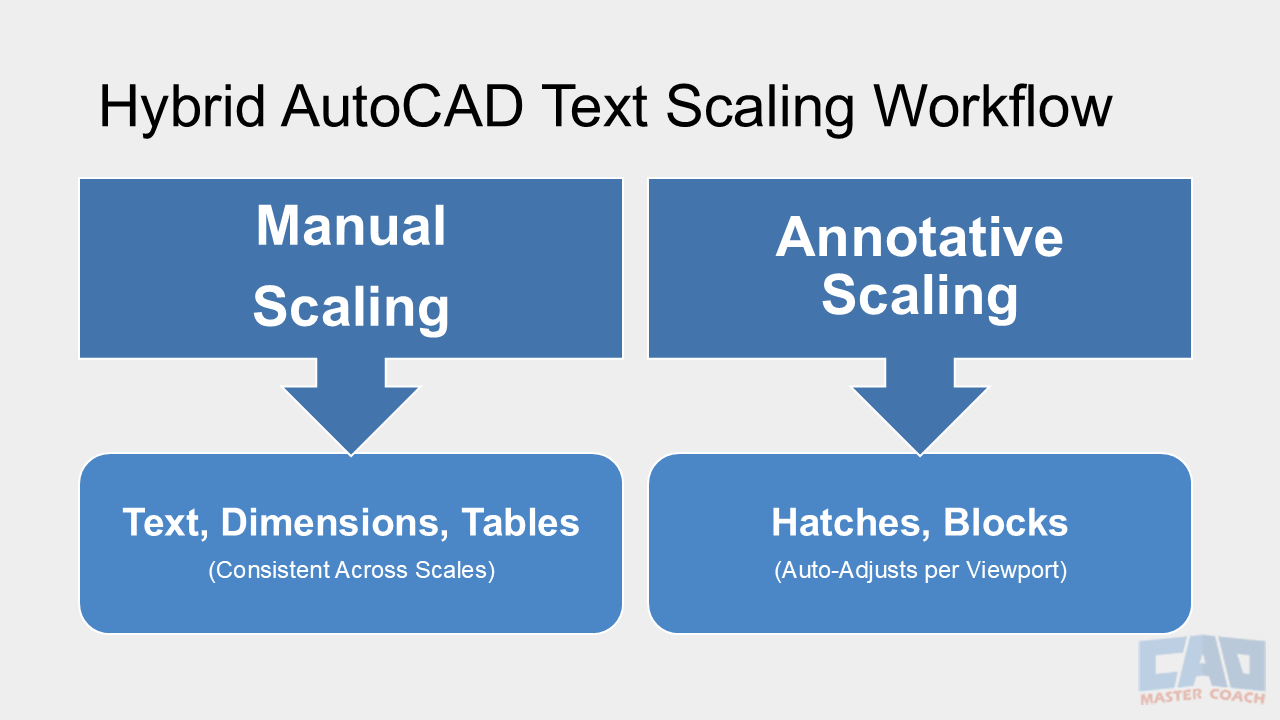
Many firms adopt a hybrid approach: manual scaling for text/dimensions and annotative scaling for hatches and blocks. This balances predictability with efficiency.
8. Hybrid Approaches
There is no rule that says you must use only one method across your entire project. In fact, many firms adopt hybrid workflows to maximize efficiency.
8.1 Common Hybrid Workflows
- Manual scaling for text and dimensions and tables (predictable and precise).
- Annotative hatches and blocks (saves time and reduces duplication).
In real-world projects, it is rare to find a drafting team that uses only one scaling method across the entire drawing set. Instead, many professionals adopt a hybrid workflow, combining the reliability of manual scaling for certain elements with the efficiency of annotative scaling for others. This approach balances control and predictability with speed and automation, ensuring that the drawing package remains accurate, legible, and easy to update.
8.1.1 Manual Scaling for Text, Dimensions, and Tables
When it comes to text, dimensions, and tables, most drafters still prefer the manual scale method. The reason is simple: these elements carry critical project information, and their clarity directly affects how contractors and consultants interpret the drawing. With manual scaling, you have complete control over the plotted size of text and dimension strings. A note that reads 3/32” high will plot at exactly that size, regardless of viewport scale.
This predictability is particularly valuable on large, complex sheets where multiple viewports exist at different scales. For example, a floor plan might be shown at 1/8” = 1’-0” while a detailed bathroom elevation is set at 1/2” = 1’-0”. By manually scaling your text and dimensions in model space, you can ensure they read consistently across all sheets, without having to manage annotative properties for dozens of viewports. While the process requires more setup upfront—calculating and applying the correct scale factors—the result is rock-solid reliability.
Tables follow the same principle. Schedules for doors, windows, or finishes are often constructed in model space and scaled manually to guarantee they remain crisp and uniform. Because schedules rarely need to change viewport-to-viewport, the manual method works especially well here.
8.1.2 Annotative Hatches and Blocks
On the other hand, elements such as hatches and blocks benefit enormously from the annotative system. Take hatching as an example: a floor pattern or wall fill that looks appropriate at 1/8” scale may appear far too dense or sparse when viewed at 1/4”. Rather than creating duplicate hatch patterns for each scale, you can assign annotative properties that automatically adjust density and appearance based on the viewport.
Blocks—especially symbols like north arrows, section markers, or detail tags—are another area where annotative scaling saves time. Instead of inserting multiple versions of the same symbol sized for different scales, a single annotative block adapts itself automatically. This reduces duplication in your block library and streamlines drawing management.
8.1.3 The Best of Both Worlds
By combining manual scaling for text-based information with annotative scaling for graphical elements, you gain the best of both worlds. Notes, dimensions, and schedules remain precise and predictable, while hatches and blocks flexibly adjust to suit multiple scales. This hybrid method also minimizes one of the common frustrations with annotative objects—losing track of which scales are supported—since you apply it only where it provides the greatest benefit.
In practice, many offices standardize this hybrid workflow as part of their CAD management strategy. Drafters are trained to use manual scaling for critical annotations and annotative scaling for repetitive graphical content. Over time, this consistency leads to cleaner drawings, fewer errors during plotting, and a smoother production process.
8.2 Benefits of Hybrid Methods
- Greater efficiency: You avoid duplicating symbols for multiple scales.
- Predictability: You maintain control over text and dimensions, where accuracy is most critical.
- Flexibility: You can adapt to consultant drawings that may use one method or the other.
8.3 Challenges
- Requires clear CAD standards to prevent staff from mixing methods inconsistently.
- Hybrid workflows can confuse new staff if not documented properly.
Ultimately, the hybrid approach is popular because it allows drafters to take advantage of annotative scaling where it truly adds value, while sticking to the reliable manual method for mission-critical annotations.
9. Industry Standards & Best Practices
Standards are the backbone of consistent annotation. Whether you use manual scaling, annotative scaling, or a hybrid, the key is consistency.
9.1 Common Standards
AIA recommendations (imperial):
- Notes: 3/32”
- Dimensions: 1/8”
- Titles: 3/16”
- Sheet titles: 1/4”
ISO recommendations (metric):
- Notes: 2.5 mm
- Dimensions: 3 mm
- Titles: 5 mm
- Sheet titles: 6 mm
9.2 Best Practices Checklist
- Define your office-wide plotted text heights and apply them consistently.
- Decide early whether you are a manual scale office or an annotative office.
- Train staff thoroughly in whichever method you choose.
- Create cheat sheets and quick reference charts.
- Test-plot a sample sheet before starting production.
9.3 CAD Standards Documentation
Include text scaling rules in your CAD standards manual. Define:
- Standard text heights.
- Standard dimension styles.
- When to use paper space vs model space.
- Which annotation method (manual or annotative) your office uses.
When standards are clear, errors decrease and productivity increases.
10. When to Break the Rules
No matter how strict your standards are, there will be times when you need to bend them.
10.1 Detail Sheets
Details often require larger text for clarity. A note that plots at 3/32” may be too small when placed next to dense linework. It is acceptable to use 1/8” or even 3/16” text in details for readability.
10.2 Site Plans
Site plans often cover large areas at small scales. Standard annotation may be illegible. Larger text and symbols are often necessary to communicate information clearly.
10.3 Presentation Drawings
Presentation drawings prioritize graphics over technical standards. Larger titles, bold text, or even custom fonts may be used to impress clients or stakeholders.
10.4 The Key: Intentionality
Breaking the rules is fine when done intentionally for readability or presentation purposes. The problem arises when inconsistency is unintentional. Always make conscious decisions about text scaling.
11. Extended Cheat Sheets
Cheat sheets are one of the most effective tools for managing text scaling, especially when using the manual scale method.
11.1 Imperial Scale Cheat Sheet (3/32” Plotted Text Height)
| Scale | Scale Factor | Model Text Height |
|---|---|---|
| 1/8" = 1'-0" | 96 | 9" |
| 3/16" = 1'-0" | 64 | 6" |
| 1/4" = 1'-0" | 48 | 4.5" |
| 1/2" = 1'-0" | 24 | 2.25" |
| 1" = 1'-0" | 12 | 1.125" |
Cheat Sheet for Common Imperial Scales (Model Text Height)
How to use this table: Use these values to set text height in model space so plotted text appears consistent across different imperial drawing scales.
11.2 Metric Scale Cheat Sheet (2.5 mm Plotted Text Height)
| Scale | Scale Factor | Model Text Height |
|---|---|---|
| 1:100 | 100 | 250 mm |
| 1:50 | 50 | 125 mm |
| 1:20 | 20 | 50 mm |
| 1:10 | 10 | 25 mm |
Metric Scale Cheat Sheet (2.5 mm Plotted Text Height)
How to use this table: Set model-space text height using these values so plotted text appears consistent across common metric drawing scales.
11.3 Practical Use
- Post cheat sheets at drafting stations.
- Include them in CAD standards manuals.
- Consider offering a downloadable PDF on your firm’s intranet or training portal.
Having quick access to these values reduces errors and speeds up production.
Conclusion
Annotation scaling is one of the most important yet misunderstood aspects of AutoCAD drafting. Without consistent scaling, your drawings lose professionalism, legibility, and reliability.
Two main methods exist:
- The Manual Scale Method: Traditional, reliable, predictable, still the most widely used for text and dimensions.
- Annotative Scaling: Modern and automated, but more complex and best suited for symbols, hatches, and certain workflows.
A hybrid approach often provides the best of both worlds, using manual scaling where precision is required and annotative scaling where automation saves time.
The key takeaway is consistency. Define your standards, train your team, and stick to one system across your projects. Provide cheat sheets, document your process, and test your setups before production.
When your text, dimensions, leaders, and tables all plot at the correct and consistent size, your drawings not only look professional—they function better in the field. Contractors can build with confidence, clients can review with clarity, and your office can work more efficiently.
Mastering text scaling isn’t glamorous, but it’s one of the foundations of professional drafting. Get it right, and everything else in your drawings becomes easier.


