AutoCAD Interface for Beginners
Master the Workspace in 1 Hour
Table of Contents
1. Opening AutoCAD for the First Time
2. Understanding the Application Menu
3. The Ribbon: Your Command Center
4. The Drawing Area
5. The Command Line
6. The Status Bar
7. The Navigation Bar
8. Model Space vs. Layout Tabs
9. Customizing the Workspace
10. Selecting Drawing Objects
11. Saving Your Workspace for Future Projects
12. Final Tips for Working Efficiently
When you first open AutoCAD, the screen can look like the cockpit of a jumbo jet. Buttons, menus, ribbons, command prompts — and that mysterious black drawing space in the middle. Don’t worry. By the time you finish this tutorial, you’ll know exactly what each part does, how to navigate it, and how to set it up so it works for you, not the other way around.
This is the exact interface breakdown I give to my new students — the same method that has helped hundreds of beginners go from confused to confident in a single afternoon.
Opening AutoCAD for the First Time
When you launch AutoCAD, you’re greeted with the Start Tab — think of it as the welcome lobby.
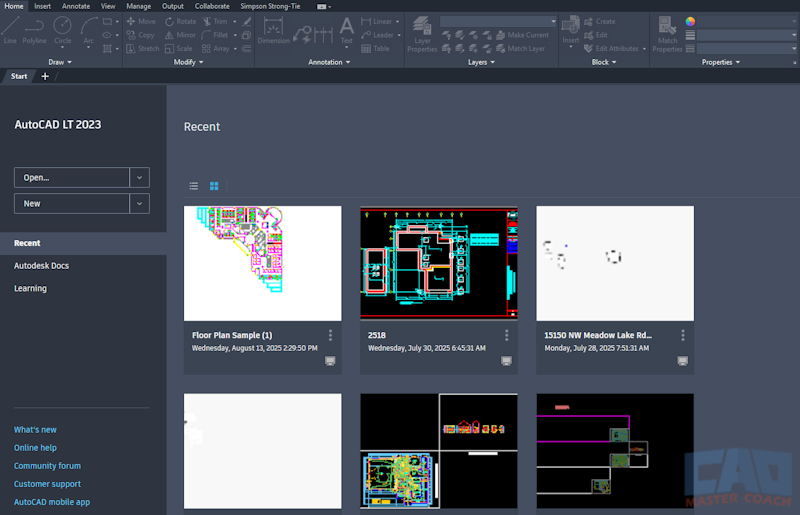
The Start Tab is your quick entry point into new or existing projects.
You’ll see:
- Create New Drawing: Opens a blank file based on a template.
- Open Files: Browse and open existing drawings (.DWG files).
- Recent Documents: Quick access to your last projects.
- Learning Resources: Autodesk’s built-in tutorials (these are decent, but we’ll go deeper here).
A few things to note about the Start Tab:
- All Ribbons are greyed out and nothing can be selected.
- None of the Menu Pull-Downs work, as it is not necessary to initiate commands when not in a drawing.
- The left column is divided into three areas:
- Upper
- Open: Opens an existing drawing or sheet set.
- New: Create a new drawing or sheet set.
- Middle: This area controls what is displayed in the main area of the Start Tab. This area can display one of three types of information:
- 1. Recently opened drawings that are stored locally on your computer.
- 2. Autodesk Projects that are stored in the cloud with your Autodesk account.
- 3. Learning. Tips and tricks for using AutoCAD published by Autodesk.
- Upper
- The middle section contains one of three types of content, depending on which option is selected in the middle section of the left column. By default, AutoCAD shows a list of recently opened drawings which can be displayed by Grid View (default) or List View. The drawings can also be sorted by last opened, or alphabetical.
- Lower
- - Links to several resources from Autodesk
- Lower
2. Understanding the Application Menu
At the top left is the Application Menu — the red “A” icon or the AutoCAD logo.
Functions you’ll use most here:
- New – Start a new drawing.
- Open – Load an existing DWG file.
- Save / Save As – Save your work (pro tip: hit Ctrl+S every 5 minutes).
- Export – Create PDF or DWF versions.
- Print – Send your drawing to paper or PDF.
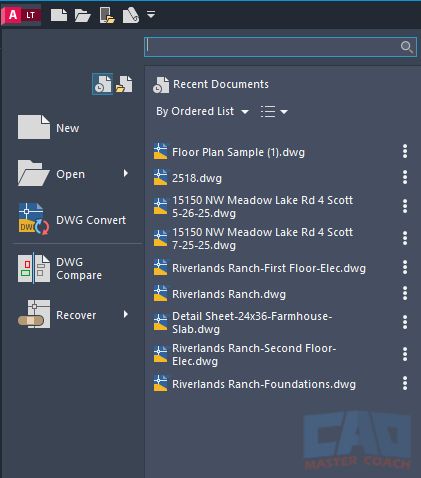
The Application Menu is your master control for file operations.
3. The Ribbon: Your Command Center
The Ribbon is the strip of tools across the top. It’s divided into tabs, and each tab is divided into panels.

The Ribbon organizes commands by category, keeping tools within reach.
Here is a breakdown of the AutoCAD Tabs and their Panels:
Home Tab
- Draw
- Modify
- Annotation
- Layers
- Block
- Properties
- Groups
- Utilities
- Clipboard
Insert Tab
- Block
- Block Definition
- Reference
- Import
- Data
- Linking & Extraction
- Location
Annotate Tab
- Text
- Dimensions
- Centerlines
- Leaders
- Tables
- Markup
- Annotation Scaling
Parametric Tab
- Geometric
- Dimensional
- Manage
View Tab
- Viewport Tools
- Named Views
- Model Viewports
- Review
- History
- Palettes
- Interface
Manage Tab
- Customization
- Applications
- Cleanup
Output Tab
- Plot
- Export to DWF/PDF
Collaborate Tab
- Share
- Autodesk Docs
- Traces
- Compare
Get the Top 35 AutoCAD Commands for FREE
4. The Drawing Area
This is the large black (or white) space where you actually draw.
Everything you create lives in Model Space unless you switch to a Paper Space Layout tab.
Navigation Basics:
- Middle Mouse Wheel – Zoom in/out.
- Press Wheel + Drag – Pan the view.
- Double-click Wheel – Zoom Extents.
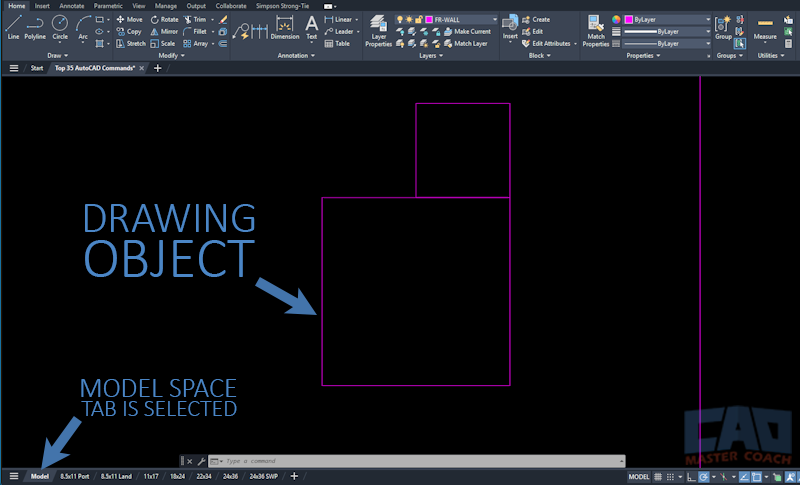
The drawing area is your main workspace. Learn mouse shortcuts early for speed.
5. The Command Line
At the bottom is the Command Line — your conversation with AutoCAD.
Why it’s critical:
- Shows prompts for the next step in a command.
- Allows you to type commands directly.
- Displays feedback and error messages.
Example:
Type LINE | Enter | Click first point | Click second point | Enter.
Along with the Command Line is Dynamic Input. Many AutoCAD commands require multiple steps and input at each step to complete. For example, when drawing a line, the input of the coordinates or location of the second endpoint is referred to as Dynamic Input. After the first endpoint of the line has been entered, the LINE command remains active and is waiting for the location of the second endpoint.
The default setting for Dynamic Input System Variable is set to receive Relative Coordinates, and that is how this course is taught.

The Command Line is AutoCAD’s brain. Learn to read and respond to its prompts.
6. The Status Bar
At the very bottom right is the Status Bar — a row of toggles that control drafting settings.
Key buttons to know:
- Ortho Mode (F8) – Locks lines to horizontal/vertical.
- Polar Tracking (F10) – Guides cursor to preset angles.
- Object Snap (F3) – Snaps to exact points (endpoints, midpoints).
- Grid Display (F7) – Shows/hides grid.
- Dynamic Input (F12) – Shows input near the cursor.
The Status Bar shows the state of many AutoCAD controls, and provides an easy location to quickly change how AutoCAD behaves.

Status Bar toggles control your drawing precision and snapping.
7. The Navigation Bar
On the right edge:
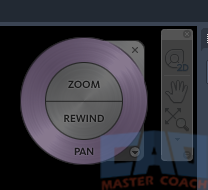
- Navigation Bar: Pan, Zoom, Orbit controls.
The Navigation Bar is a convenient way to access the PAN command.
8. Model Space vs. Layout Tabs
Tabs at the Bottom-left of the screen:
- Model – Where you create your drawing. The space where the drawing is created. Everything in Model Space should be drawn at a 1:1 scale. There can be only one Model Space in a drawing.
- For example, if you are drawing a building that is 24 feet by 36 feet, the building in Model Space should be drawn to be those dimensions. The building will be scaled in Paper Space to fit on paper.
- Layout 1 / Layout 2 – Paper space is used for printing drawings 1:1 in title blocks that are drawn to the size the drawing sheet will be. Paper Space is most often used to display title blocks of the drawing. The title blocks are drawn at a 1:1 scale, and the MVIEW command is used to create Viewports of the drawing, and each are scaled to an appropriate scale. There can be as many Paper Spaces in a drawing as necessary.
- For example, if the title block you are using is ARCH D (24” x 36”), then the title block should be drawn to be 24” x 36”, less the paper margins.
- Viewport: A window from Paper Space into a portion of the Model Space that is scaled to a specific scale. Use the MVIEW command to create a Viewport window while in Paper Space. MVIEW is not able to be used while in Model Space.
Think of Model Space as your workshop and Paper Space Layout Tabs as your print shop.
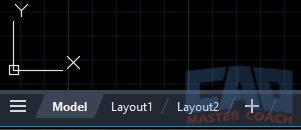
Model Space is for design, Layout Tabs are for plotting.
9. Customizing the Workspace
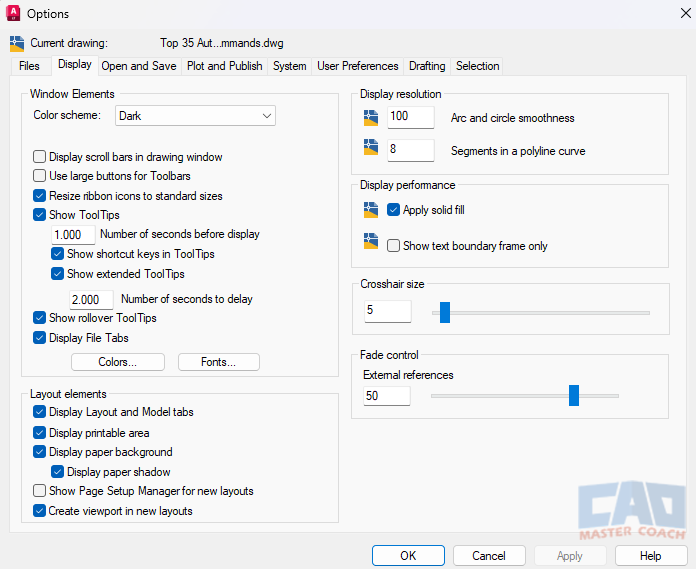
You can rearrange panels, change colors, and hide unused tools.
Steps:
1. Right-click the Ribbon → “Customize”
2. Move frequently used panels to the left.
3. Go to Options (OP command) → Display → Change background color.
4. Save your new layout.
10. Selecting Drawing Objects
Many AutoCAD commands require the user to select one or more objects in the drawing. Selecting drawing objects can be done in one of three ways:
1. Direct Selection
2. Window Selection
3. Crossing Selection
Each of these selection methods is described on the linked pages.
11. Saving Your Workspace for Future Projects
Once customized:
- Type WSSAVE → Name it “My Workspace.”
- Next time, load it with WSCURRENT.

Save your workspace so you don’t lose your setup.
12. Final Tips for Working Efficiently
- Learn keyboard shortcuts (L for Line, C for Circle, M for Move).
- Use the mouse wheel for Panning and Zooming — it’s faster than toolbar buttons.
- Keep your left hand on the keyboard and right hand on the mouse.
- Customize tool palettes with your most-used blocks.
